2021.11.27 Django Country field_정리노트
드디어드디어...!!!!!!
돌아왔다!!!! 장고로!!!! 가보작작작작
쨋든 오늘은 장고에 있는 country field 기능을 사용해서 국가를 선택하게 하고 받아온 국가코드를 JS 아스키코드 로직을 통해서 이모지로 띄우기! 물론 장고 country 만으로도 국기를 띄울 수 있는데, 이모지로 띄운 이유, 한계까지 포스팅 할 예정정
https://github.com/SmileyChris/django-countries
GitHub - SmileyChris/django-countries: A Django application that provides country choices for use with forms, flag icons static
A Django application that provides country choices for use with forms, flag icons static files, and a country field for models. - GitHub - SmileyChris/django-countries: A Django application that pr...
github.com
오늘 사용할 라이브러리 주소! 얘가 하라는대로 일단 다해주자

설치부터 ㄲㄲ
pip install django-countries
장고에서는 설치하면 ?
settings.py

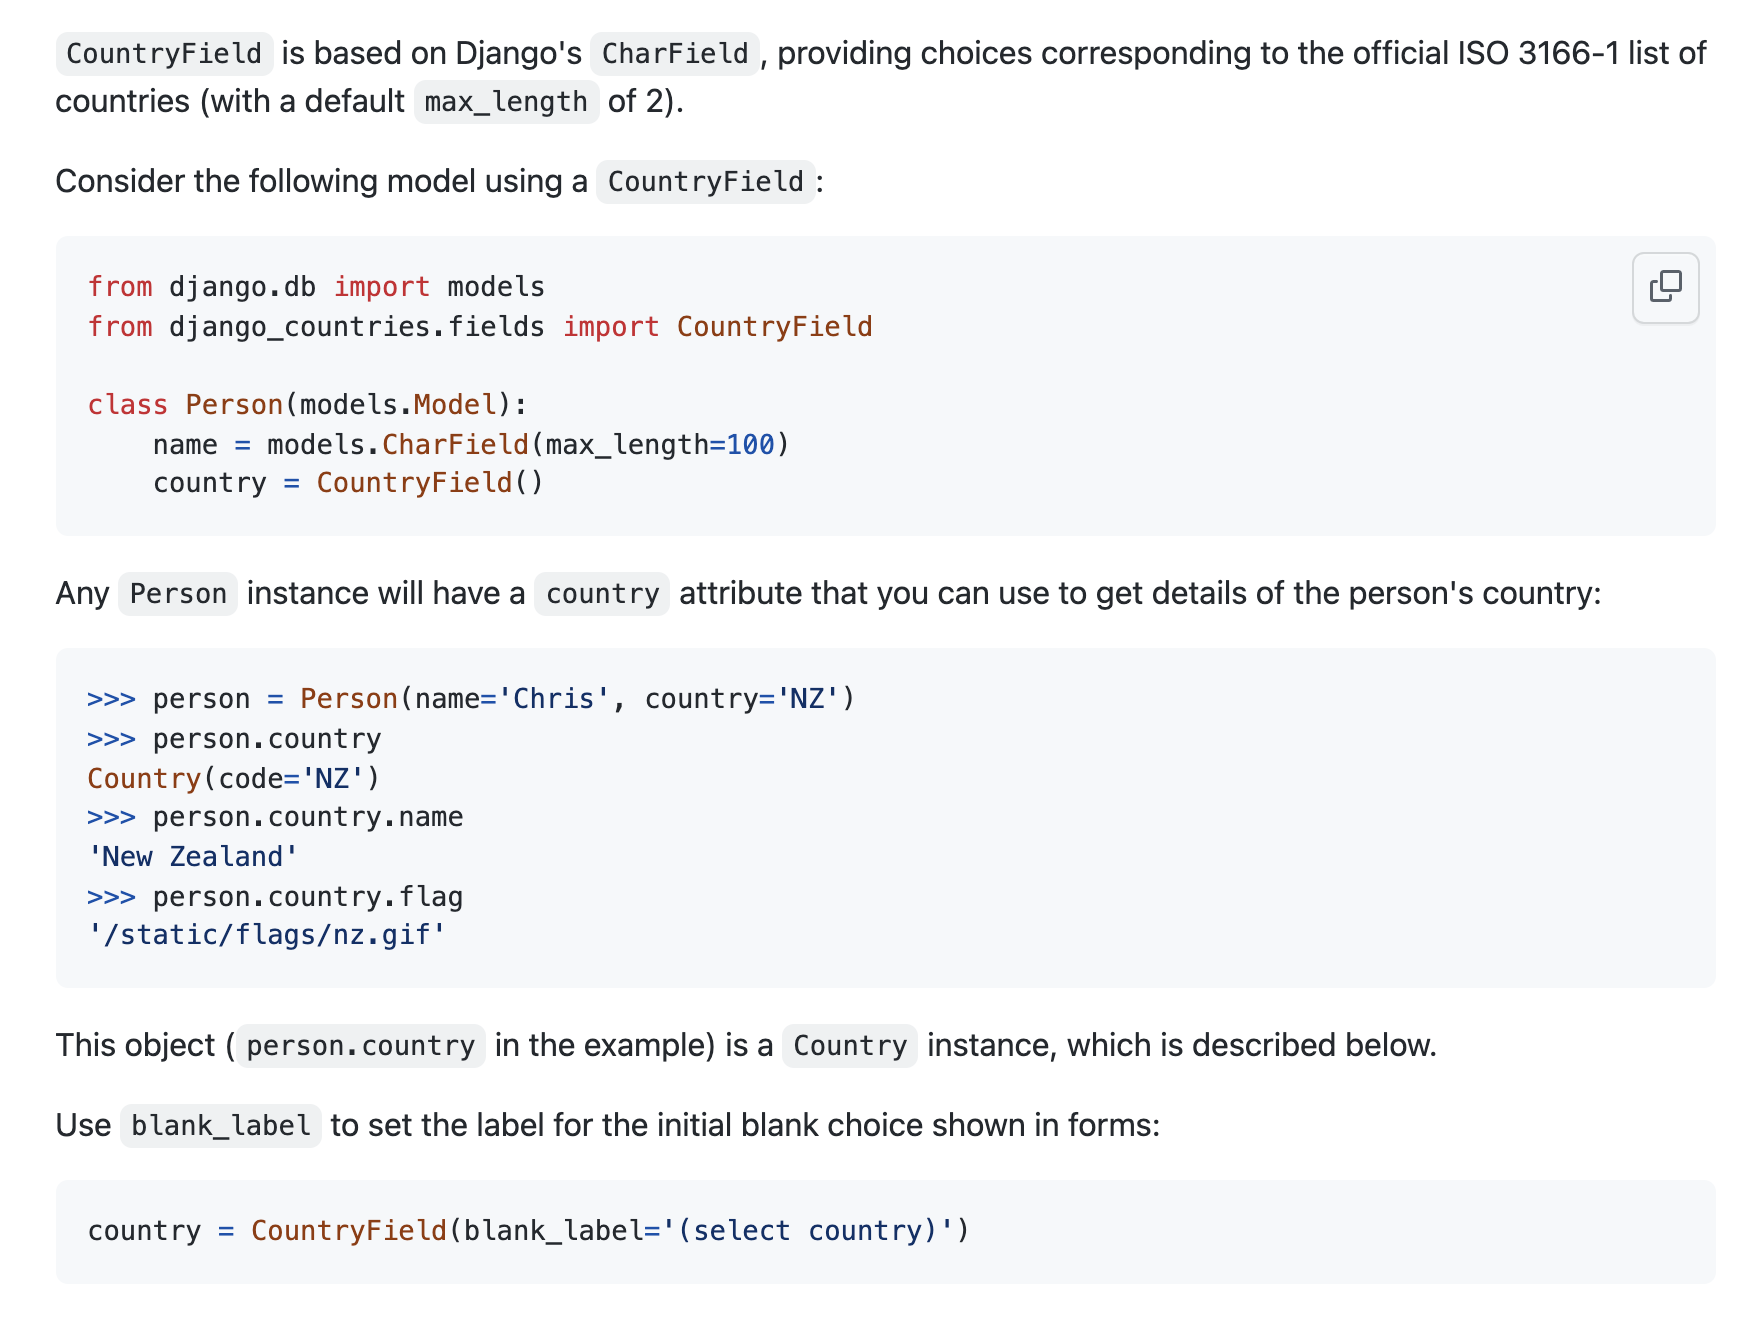
어어 그래 CountryFiled 라고 모델에서 쓰면 되는거고 반환하는 값은 2가지 문자열 코드네 그래그래 그러고 맨 처음 빈 값일 때 띄워줄 문자열 또한 blank_label 로 적어줄 수 있다네 그럼 유저가 회원가입할 때 쓸 모델에다가 하나 추가해주면 되겠당
models.py

나는 커스텀 유저에다가 넣었는데, User 관련 모델이 아니면 바로 해당 모델에 CountryField 에 추가만 하면 성공쓰임 ( 위에 Person 모델 처럼)
아참 맨 위에
from django_countries.fields import CountryField
얘 불러와줘야함 ㅇㅇㅇ
User 에서 적어줬기 때문에 커스텀 유저가 익숙치 않다면 조금 빡셀텐데
https://docs.djangoproject.com/en/3.2/topics/auth/customizing/#a-full-example
Customizing authentication in Django | Django documentation | Django
Django The web framework for perfectionists with deadlines. Overview Download Documentation News Community Code Issues About ♥ Donate
docs.djangoproject.com
나는 이미 한번 커스텀 유저 모델을 해보기도 했고, 공식문서가니까 풀 예제 있어서 model 이랑 admin 그대로 주욱 긁어와서 마찬가지로 county Field 만 추가해줬다!! 저 위에껀 내가 팀원들이랑 한 프로젝트라서 좀 헷갈릴거같아서 가져옴.
프로젝트에 붙이기 전에 혼자 연습하면서 공식문서 그냥 따라한 코드 있어서 헷갈릴수도 있는 나같은 사람 있을까봐 이 버전도 올리겠음.
딱! 정리하면, User 부분이 아닌 다른 모델에 붙일거라면 CountryField 부분만 추가하면 되고,
User 모델에 붙이는거면 기존 걸 가져와도 약간의 커스텀이 필요한 시점이기 때문에 쵸큼 까다로워지는데, 쨋든 공식문서 그냥 복붙하면 되고 개념이 궁금하다 하시며눈
https://korinkorin.tistory.com/41
2021.01.18 django User Custom Model
2021.01.18 _django User custom model _정리노트 드디어.. 올 것이 왔군 진짜 이것때문에 많이 고생했다 했어... 지금도 아마 블로그를 쓰면서 보면 엉망인 코드가 많을 것 같아 두렵지만... 한번 그래도 정
korinkorin.tistory.com
제가 또 예전에 정리를 대충은 해놨네여 ㅎㅅㅎ 호호 근데 이거는 예전 버전이라서 그냥 읽어만 보세여
마지막으로 기존 프로젝트에서 쓰던 커스텀 유저 모델이 있다면, 유저모델에 CountryField 부분만 추가하면 되는!!!!
뭐 이래나저래나 필드 하나만 추가하면 되니까 country 자체는 너무 간단하네여 ㅎㅅㅎ 혹시 User 에 나처럼 붙일 사람 있을까봐 밑에 공식문서 full example 도 같이 추가!
models.py
from django.db import models
from django.contrib.auth.models import (
    BaseUserManager, AbstractBaseUser
)
from django_countries.fields import CountryField


class MyUserManager(BaseUserManager):
    def create_user(self, email, country, password=None):
        """
        Creates and saves a User with the given email, date of
        birth and password.
        """
        if not email:
            raise ValueError('Users must have an email address')

        user = self.model(
            email=self.normalize_email(email),
            country=country,
        )

        user.set_password(password)
        user.save(using=self._db)
        return user

    def create_superuser(self, email, country, password=None):
        """
        Creates and saves a superuser with the given email, date of
        birth and password.
        """
        user = self.create_user(
            email,
            password=password,
            country=country,
        )
        user.is_admin = True
        user.save(using=self._db)
        return user


class MyUser(AbstractBaseUser):
    email = models.EmailField(
        verbose_name='email address',
        max_length=255,
        unique=True,
    )
    country = CountryField(blank_label='(select country)')
    likes = models.ManyToManyField("CRUD.Post",related_name="like_users")
    is_active = models.BooleanField(default=True)
    is_admin = models.BooleanField(default=False)

    objects = MyUserManager()

    USERNAME_FIELD = 'email'
    REQUIRED_FIELDS = ['country']

    def __str__(self):
        return self.email

    def has_perm(self, perm, obj=None):
        "Does the user have a specific permission?"
        # Simplest possible answer: Yes, always
        return True

    def has_module_perms(self, app_label):
        "Does the user have permissions to view the app `app_label`?"
        # Simplest possible answer: Yes, always
        return True

    @property
    def is_staff(self):
        "Is the user a member of staff?"
        # Simplest possible answer: All admins are staff
        return self.is_admin
country 부분만 공식문서보고 추가한겨 어렵지 않어않어
이러고 마찬가지로 공식문서에서 하라는대로
admin.py
from django.contrib import admin
from django import forms
from django.contrib import admin
from django.contrib.auth.models import Group
from django.contrib.auth.admin import UserAdmin as BaseUserAdmin
from django.contrib.auth.forms import ReadOnlyPasswordHashField
from django.core.exceptions import ValidationError


from .models import MyUser


class UserCreationForm(forms.ModelForm):
    """A form for creating new users. Includes all the required
    fields, plus a repeated password."""
    password1 = forms.CharField(label='Password', widget=forms.PasswordInput)
    password2 = forms.CharField(label='Password confirmation', widget=forms.PasswordInput)

    class Meta:
        model = MyUser
        fields = ('email', 'country')

    def clean_password2(self):
        # Check that the two password entries match
        password1 = self.cleaned_data.get("password1")
        password2 = self.cleaned_data.get("password2")
        if password1 and password2 and password1 != password2:
            raise ValidationError("비밀번호가 일치하지 않습니다.")
        return password2

    def save(self, commit=True):
        # Save the provided password in hashed format
        user = super().save(commit=False)
        user.set_password(self.cleaned_data["password1"])
        if commit:
            user.save()
        return user


class UserChangeForm(forms.ModelForm):
    """A form for updating users. Includes all the fields on
    the user, but replaces the password field with admin's
    disabled password hash display field.
    """
    password = ReadOnlyPasswordHashField()

    class Meta:
        model = MyUser
        fields = ('email', 'password', 'country', 'is_active', 'is_admin')


class UserAdmin(BaseUserAdmin):
    # The forms to add and change user instances
    form = UserChangeForm
    add_form = UserCreationForm

    # The fields to be used in displaying the User model.
    # These override the definitions on the base UserAdmin
    # that reference specific fields on auth.User.
    list_display = ('email', 'country', 'is_admin','is_active')
    list_filter = ('is_admin',)
    fieldsets = (
        (None, {'fields': ('email', 'password')}),
        ('Personal info', {'fields': ('country',)}),
        ('Permissions', {'fields': ('is_admin',)}),
    )
    # add_fieldsets is not a standard ModelAdmin attribute. UserAdmin
    # overrides get_fieldsets to use this attribute when creating a user.
    add_fieldsets = (
        (None, {
            'classes': ('wide',),
            'fields': ('email', 'country', 'password1', 'password2'),
        }),
    )
    search_fields = ('email',)
    ordering = ('email',)
    filter_horizontal = ()


# Now register the new UserAdmin...
admin.site.register(MyUser, UserAdmin)

# ... and, since we're not using Django's built-in permissions,
# unregister the Group model from admin.
admin.site.unregister(Group)
마찬가지로 복붙 후 country 만 붙여준거임. 주석도 내가 단거 아님 난 영어 못해...ㅎ.... 공식문서에서 친절하게 하나하나 설명해주더라구 최고다 증맬루 이러고 이 걸 같이 보고 계시는 당신은 view 로 바로 가시오. 폼 작성을 어드민에서 했으니 우리는 따로 forms.py 를 만들 필요가 없다오
아 참 여기서는 UserChangeForm 까지 친절하게 적어주셨는데 여기서 쓰진 않을거라서 안써줘도 되는데 일단 나는 UserAdmin 때문에 넣어줬음. 단순히 얘는 빠르게 돌려보기 위한 수단이니까 디테일하게 막 필요없는건 고치고 하는 건 안했음!!
만약 기존 프로젝트에 커스텀 유저 모델이 있고 추가를 해줘야하는 상황이다??
forms.py

forms.py 에다가 country 필드만 추가해주면 땡이지롱. 사실 어드민에 적은 UserCreationForm 형태가 장고 기존에 있는UserCreationForm 기능이어서 저거까지 커스텀해줄 필요가 또 없다면은 이렇게 또 가져와서 필드만 추가해줘도 됨.
방법의 차이고 살짝 살짝 다르지만 결은 같슴다!
여기서 가져와서 여러 에러처리를 해줄수도 있고, 위의 공식문서 예제처럼 어드민이든 폼이든 직접 모델폼으로 UserCreationForm 을 작성해서 에러처리를 해줘도 되고 ( 뭐 닉네임 글자 제한이라던가, 비밀번호 일치 하지 않는 등등 ) 이것도 자기가 원하는 방식대로 하면 될 것 같다.
이제 모델도 준비가 되었고, 폼도 준비가 되었다. 뭔가 분명 간단한데 간단하지 않는 이 느낌 홀홀...
그렇다면! view 로 꼬!
views.py
from django.shortcuts import redirect, render
# forms.py 를 작성했으면 forms 에서 가져오면 됨.
from .admin import *
def user(request):
    if request.method == "POST":

        form = UserCreationForm(request.POST)
        if form.is_valid():
        # form 유효성 검사 후 저장
            form.save()
            return redirect('index')
    else:
    # 에러 시 빈 폼 다시 렌더링
        form = UserCreationForm()

    return render(request,'user.html',{'form':form})
이거는 머 회원가입이니까 그냥 머 이정도에서 끝내겠움. 만약 위의 SignUpForm 과 같은 forms.py 에서 가져온거면 UserCreationForm 부분에 우리가 forms.py 에서 만들어준 폼으로 적어주면 된다.
그러고 간단하게
templates/user.html (templates 폴더 없으면 생성해서 넣기. 장고에서 하나의 규칙.)
<!DOCTYPE html>
<html lang="en">
<head>
    <meta charset="UTF-8">
    <meta http-equiv="X-UA-Compatible" content="IE=edge">
    <meta name="viewport" content="width=device-width, initial-scale=1.0">
    <title>Document</title>
</head>
<body>

    <form method="POST" action="{% url 'user' %}">
        {% csrf_token %}
        {{form.as_p}}
        <button type="submit">create</button>
    </form>
</body>
</html>
form 만 띄워주면 끝! view에서 들고온 {'form':form} 변수를 템플릿에서 써준것임. 그냥 쓴거 아니구 ㅇㅇ 뷰랑 템플릿은 프로젝트 커스텀이 좀 다르게 되어 있어서 헷갈릴까봐 간단하게 연습한 템플릿과 뷰로 들고왔움!!
urls.py
from django.contrib import admin
from django.urls import path
from .views import *

urlpatterns = [
   path('accounts/',user, name="user"),

]
마지막으로 url 로 view 를 연결해주자.
그러면
실행 화면
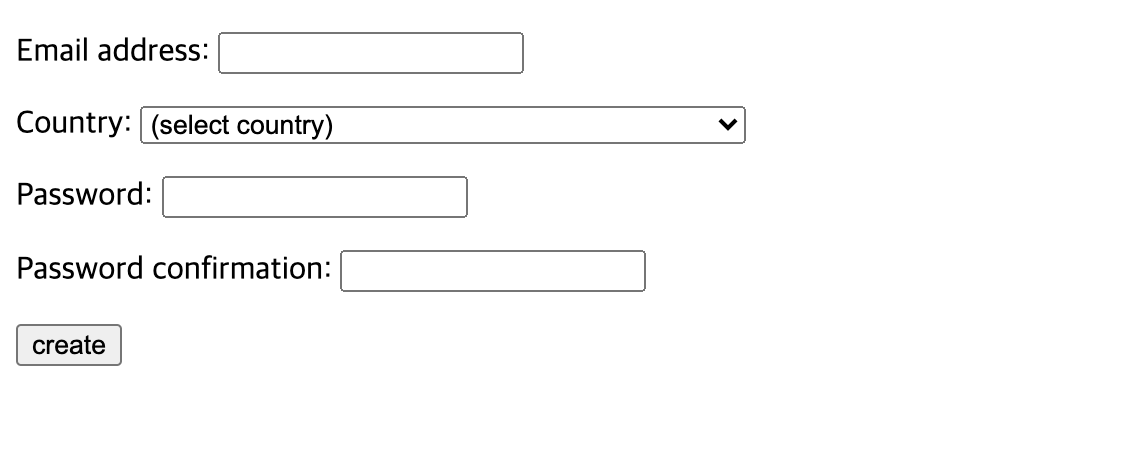
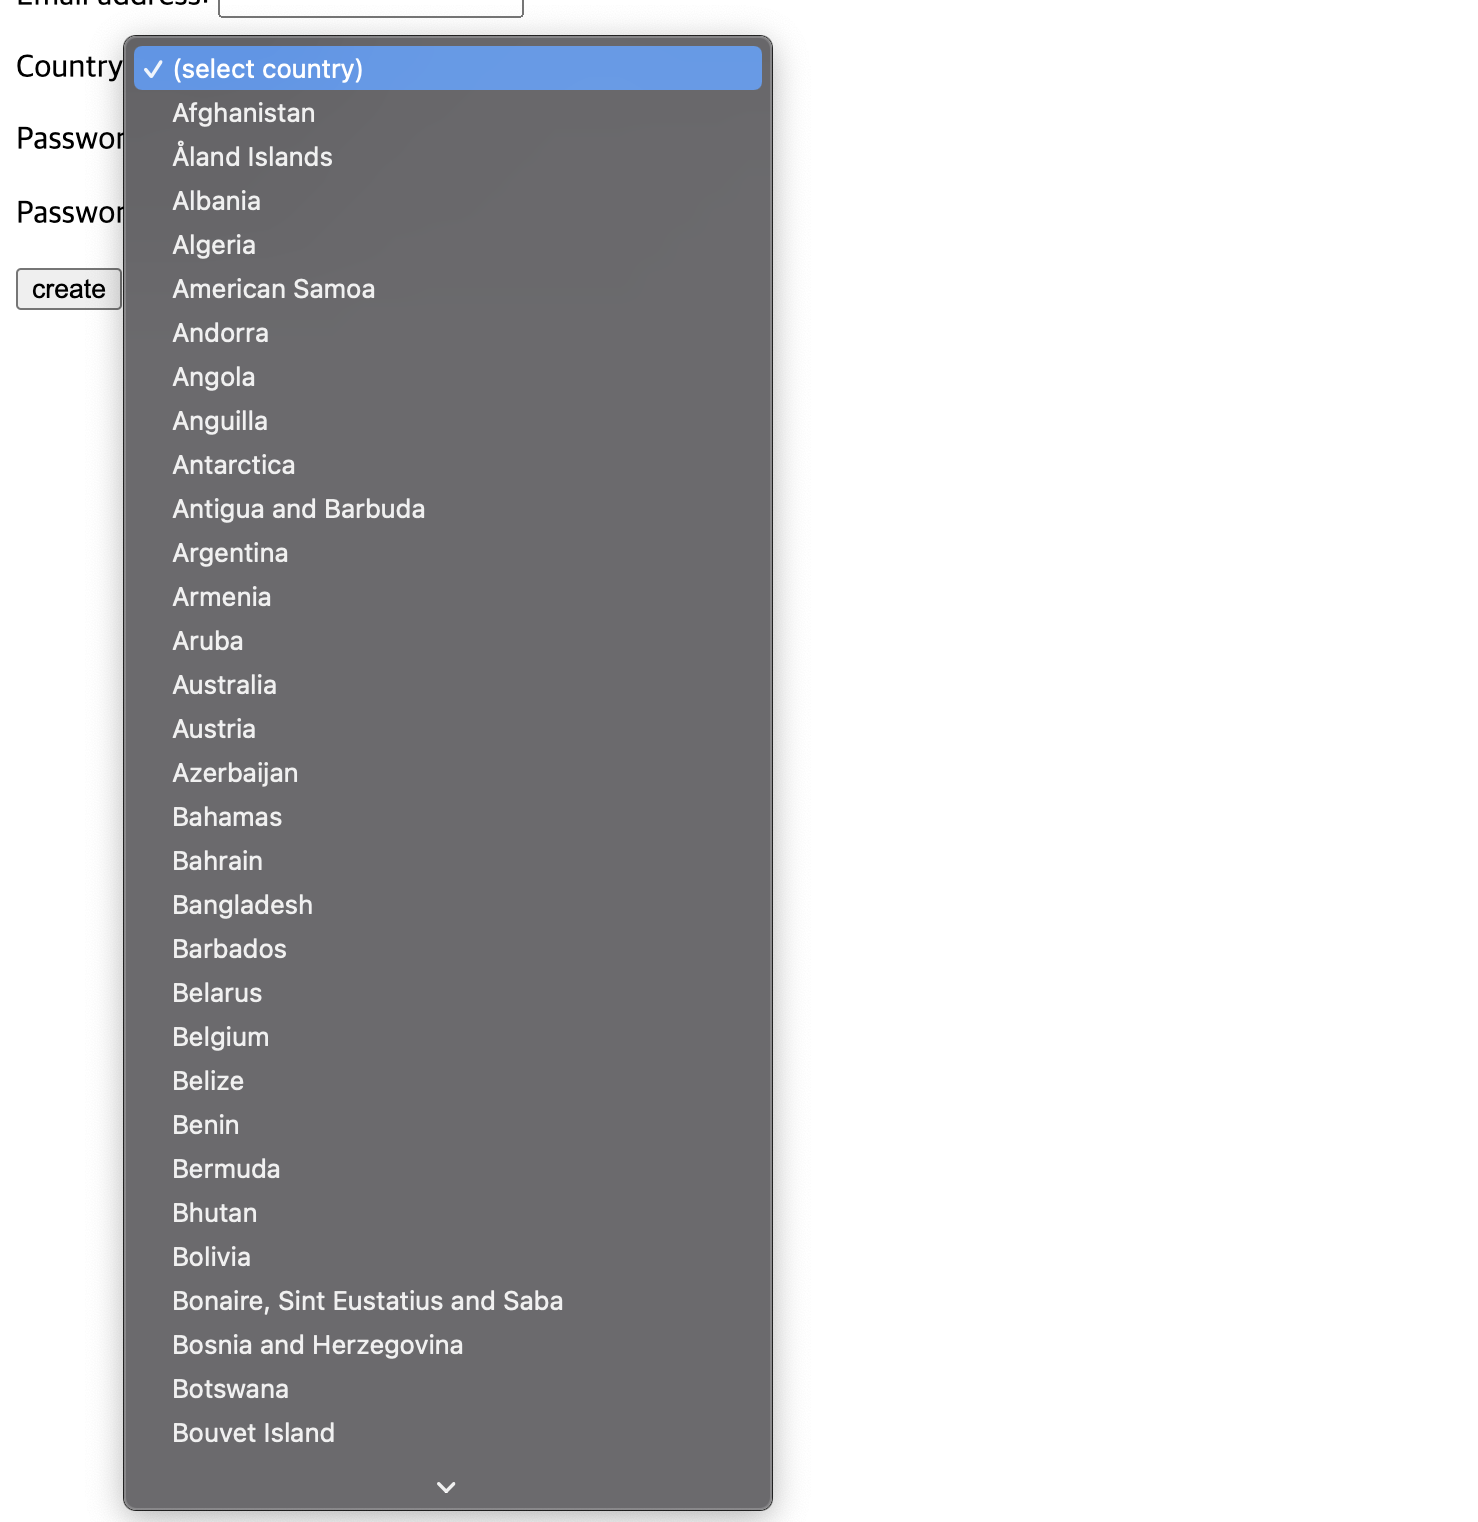
country 잘 뜨면 성공! 아까 말했던 blank_label="(select country)" 안적어주면
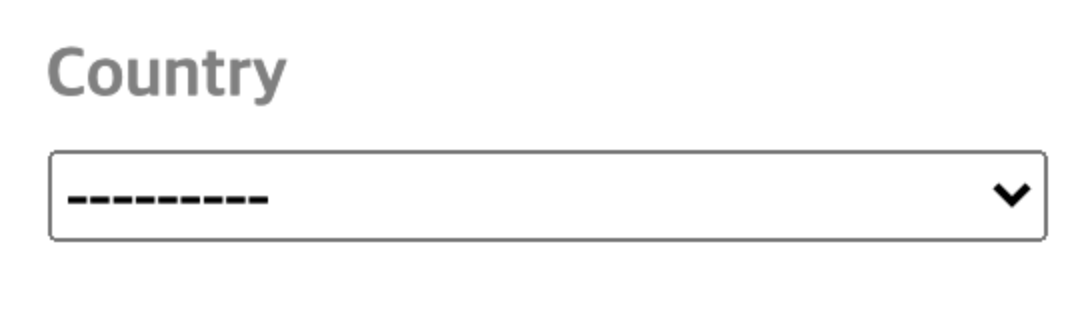
요롷게 뜨는 차이니 참고!!!!!!
후 이제 그럼 회원가입할 때 KR 과 같이 국가 코드는 바꿔오는데 css 는 어쩐담 난 국기를 띄우고 싶은거니까 ㅇㅇㅇ
라이브러리에 그것도 적혀있다.

<link rel="stylesheet" href="{% static 'flags/sprite-hq.css' %}">
<link rel="stylesheet" href="{% static 'css/flag.css' %}">
이거를 html 에서 가져와서
<i class="{{ country.flag_css }}"></i>
이렇게 적어주면 된다고!!! 그러면 얘를 띄울 html 은 index 로 간단하게 해주자.
그러면 view 에서 현재 요청된 request.user 를 가져와서 템플릿에서는 요쳥된 유저의 country 를 요롷게 적어주면 되겠다하구 그대로 적었음.
views.py
def index(request):
    user = request.user
    return render(request,'index.html',{'user':user})
그러고
index.html
{% load static %}
{% load countries %}
<!DOCTYPE html>
<html lang="en">
<head>
    <meta charset="UTF-8">
    <meta http-equiv="X-UA-Compatible" content="IE=edge">
    <meta name="viewport" content="width=device-width, initial-scale=1.0">
    <title>Document</title>
    <link rel="stylesheet" href="{% static 'flags/sprite-hq.css' %}">
    <link rel="stylesheet" href="{% static 'css/flag.css' %}">
 </head>
<body>
    {{user}} 님 안녕하세열
    {{user.country}}
    <i class="{{ user.country.flag_css }}"></i>
	 Bigger: <i class="flag2x {{ user.country.flag_css }}"></i>

</body>
</html>
더 큰 것도 띄울 수 있대서 이렇게 띄워서 되는지 실행!
실행 화면
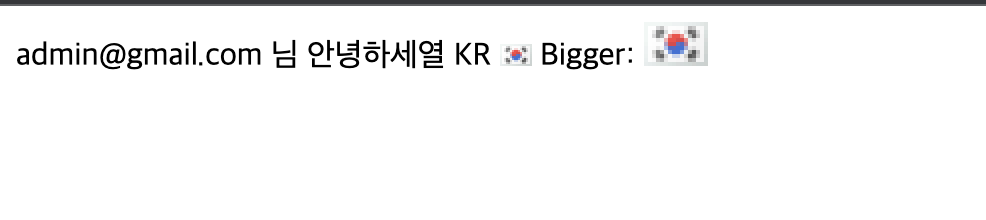
오오오오오오오오!!!!!!! 잘 띄워지는군 역시 KR 로 반환해서 우리 태극기 작은거랑 큰거 둘 다 잘 띄워진다... 근데 화질 너무 깨지지 않음....?ㅠ ㅠ

아무래도 기존 라이브러리에 등록되어 있는 gif 를 가져오는데 얘가 옴총 작더라구... 어떻게든 살릴 방법을 찾았지만 결국 원본 이미지가 너무 작아서 이거는 쓰지 않기로 결정......
그래서 아까 말한!!!! JS 를 사용해서 이모지로 바꿔보았다. 지금 우리가 쨋든 결국엔 회원가입할 때 user 의 국가 코드를 가져오니까 얘를 사용해서 할 수 있는 방법이 없을까 하구 찾아보니까 역시 있었다. 이모지로 띄우게 되면 이미지가 아닌 글자로 인식되기 때문에 화질이 깨지지 않고 크기도 자유자재로 css 로 바꾸면 되니까!
https://dev.to/jorik/country-code-to-flag-emoji-a21
Country Code to Flag Emoji
Instead of showing boring country codes like US, CH, NL, it is much nicer to show the flag emojis, 🇺🇸...
dev.to
열시미 구글링하면 안나올게읍어....휴~~~
여기서 이 방법을 사용했다! 휴... 간단한듯 간단하지 않는 생소한 JS 개념이 나와서 정리정리
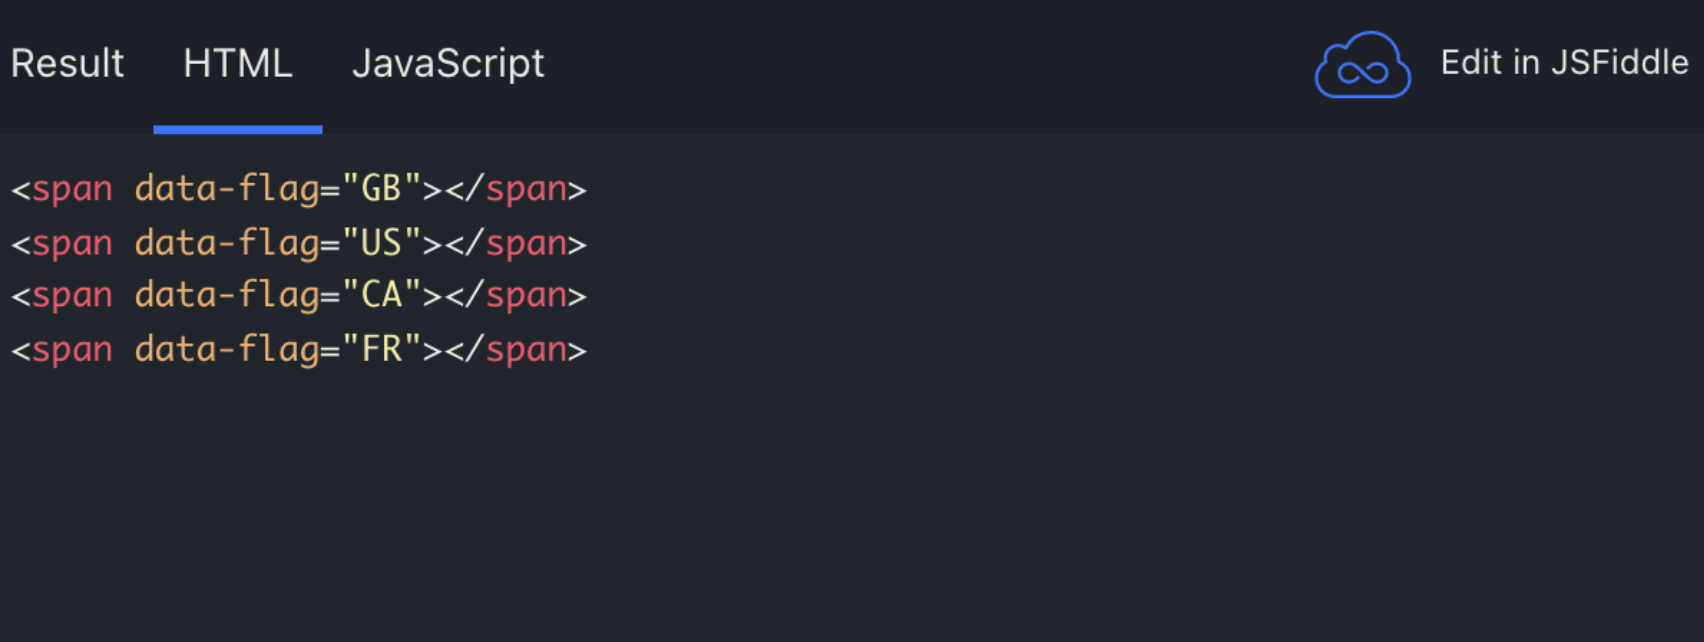
먼저 querySelectorAll('[data-flag]') 이 부분이 띠용 ? 해서 찾아봤다.
https://developer.mozilla.org/en-US/docs/Web/API/HTMLElement/dataset
HTMLElement.dataset - Web APIs | MDN
The dataset read-only property of the HTMLElement interface provides read/write access to custom data attributes (data-*) on elements. It exposes a map of strings (DOMStringMap) with an entry for each data-* attribute.
developer.mozilla.org
일단 querySelectorAll([]) 이 부분은 속성 이름으로 해당 요소를 들고 올 수 있고 그를 문자열로 감싸준 것이다.
그리고 위의 문서를 보면,

해당 요소를 DomStringMap 으로 들고오는데, data-keyname 으로 적어주면, js 에서는 요소.dataset.keyname 으로 해당 요소의 value 를 들고 올 수 있다.
그러니까 우리는 data-flag 로 만약 html 요소를 적어준다면,
const flagReplace = document.querySelectorAll('[data-flag]');
flagReplace.forEach(s =>
        console.log(s))
이렇게 요소를 들고와서
const flagReplace = document.querySelectorAll('[data-flag]');
flagReplace.forEach(s =>
        console.log(s.dataset))

얘는 요롷게 반환하고 마침내!!!
const flagReplace = document.querySelectorAll('[data-flag]');
flagReplace.forEach(s =>
        console.log(s.dataset.flag))
이렇게 value 값을 들고올 수 있다!!!! 아휴 어렵다..... 번거롭지만 유동적인 값이 들어가야할 때는 이 방법도 있구나..! 넘 신기하다
그럼 여기까진 이해!!!
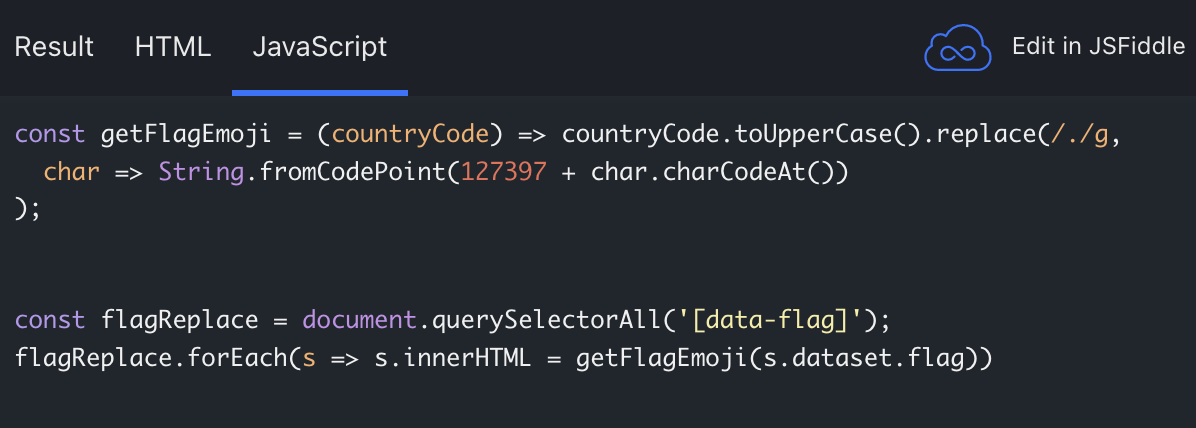
 // data-flag 속성을 모두 찾아서 문자열로 가져오기
 const flagReplace = document.querySelectorAll('[data-flag]');
 // s.dataset.flag value 에 하나하나 getFlagEmoji 함수를 실행한 값을 html 에다가 넣음
 flagReplace.forEach(s => s.innerHTML = getFlagEmoji(s.dataset.flag))
그럼 이 함수가 남았다. 후... 여기서 countryCode 는 s.dataset.flag 가 되겠군 그럼 얘를 어떻게 요리조리하는지 볼까
 const getFlagEmoji = (countryCode) => countryCode.toUpperCase().replace(/./g,
            char => String.fromCodePoint(127397 + char.charCodeAt())
        );
먼저 toUpeerCase 함수는 말그대로 대문자로 반환하는 함수니까 간단히 넘어가고 replace! 봅시당
https://developer.mozilla.org/ko/docs/Web/JavaScript/Reference/Global_Objects/String/replace
String.prototype.replace() - JavaScript | MDN
replace() 메서드는 어떤 패턴에 일치하는 일부 또는 모든 부분이 교체된 새로운 문자열을 반환합니다. 그 패턴은 문자열이나 정규식(RegExp)이 될 수 있으며, 교체 문자열은 문자열이나 모든 매치
developer.mozilla.org
오.... 읽어보니 음음 우리는 정규식이랑 함수를 사용한 제일 어려운 케이스균뇨... 휴 /./g 가 뭔지 또 찾아보니 글자를 공백포함으로 하나하나 나누는 정규식이더균
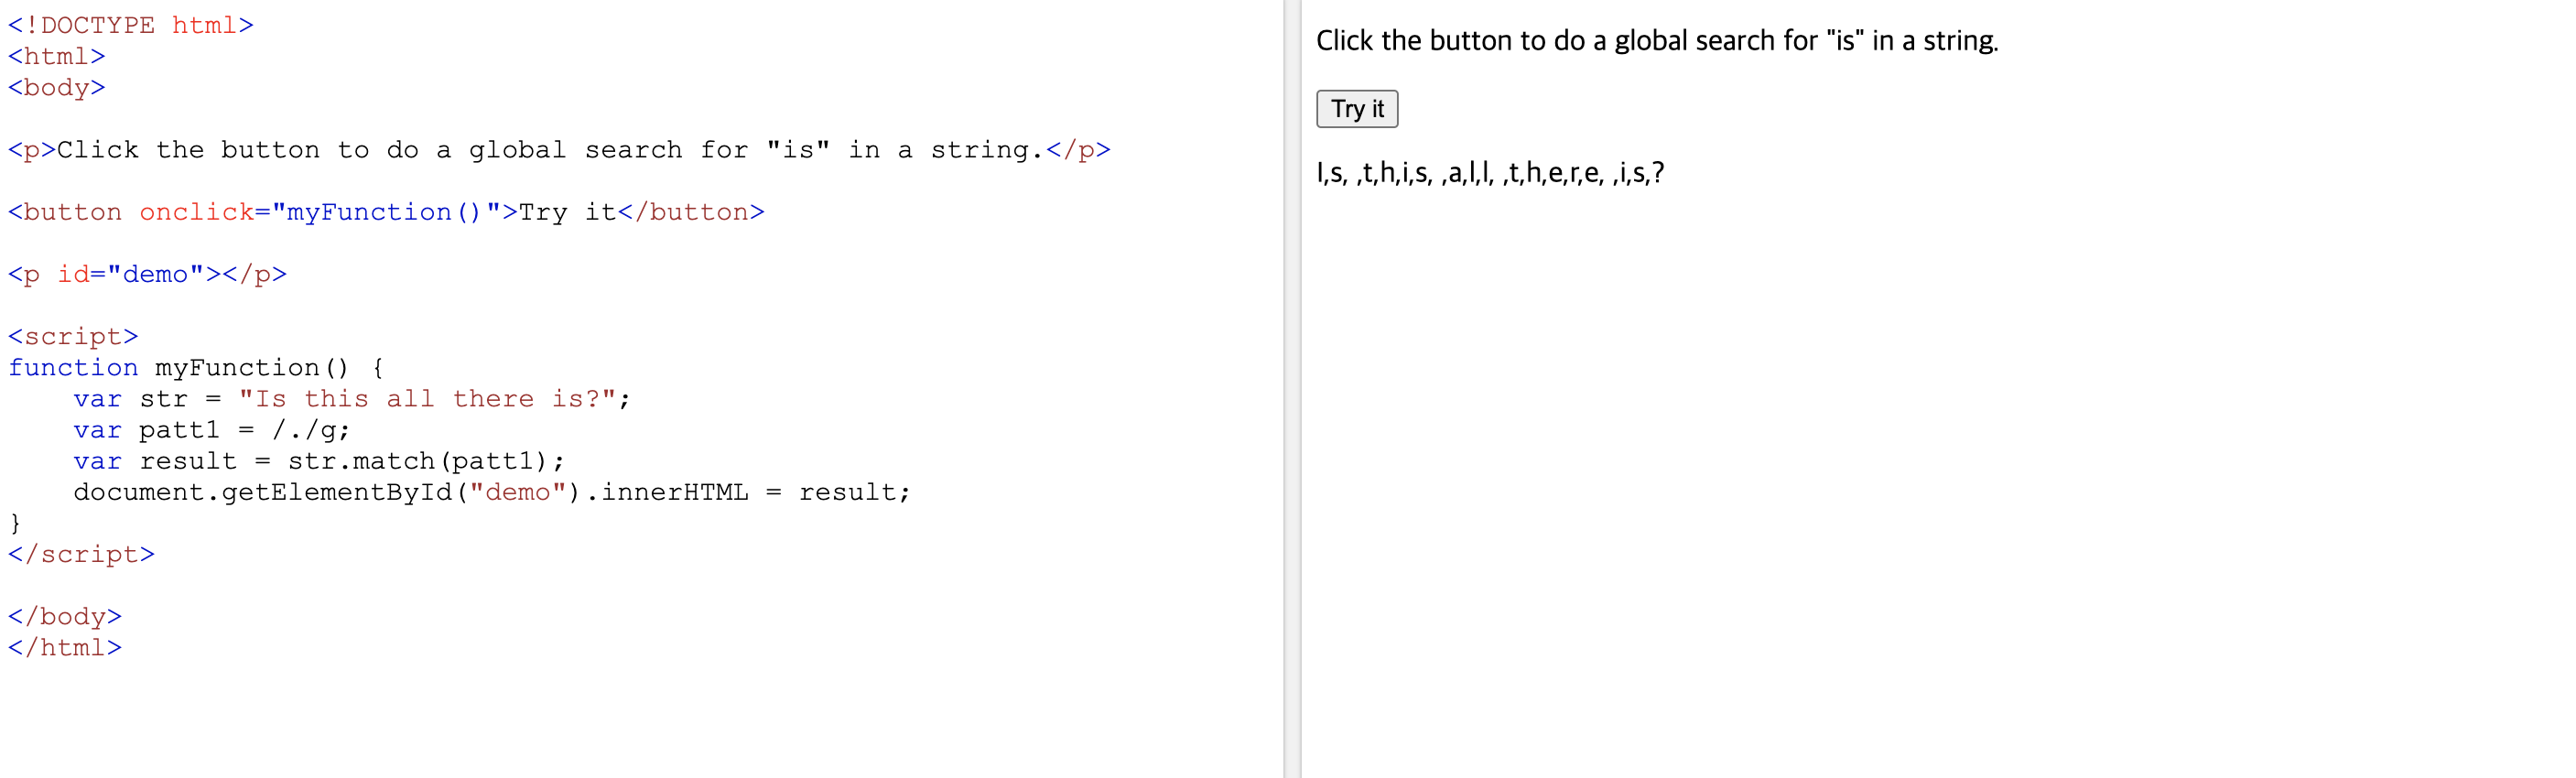
찾아도 안나와서 혼자 직접 돌려봄 ㅋㅅㅋ 쨋든 이렇게 나눈 하나하나를 다시 fromCodePoint 함수를 돌렸네!!!
String.fromCodePoint() - JavaScript | MDN
The static String.fromCodePoint() method returns a string created by using the specified sequence of code points.
developer.mozilla.org
흐억....... 흐억...힘들군 얘는 또 새로 나온 자스 함수로 지정된 코드 포인트에 해당하는 문자열을 반환....!! 그 문자열이라함은....!
https://developer.mozilla.org/ko/docs/Web/JavaScript/Reference/Global_Objects/String/charCodeAt
String.prototype.charCodeAt() - JavaScript | MDN
charCodeAt() 메서드는 주어진 인덱스에 대한 UTF-16 코드를 나타내는 0부터 65535 사이의 정수를 반환합니다.
developer.mozilla.org
허허헣ㅎ허허허 얘를 사용해서 UTF-16 코드로 반환된 값에 12397 을 더하면 코드 포인트함수가 국기 이모지로 바꿔주는 과정이라는데 뭐시깽이죠... 일단 어렵지만 어떻게 돌아가는지는 알겠다..
https://andycroll.com/ruby/convert-iso-country-code-to-emoji-flag/
Convert a two character ISO country code to an emoji flag
From ISO 3166-1 alpha-2 to lovely emoji flag
andycroll.com
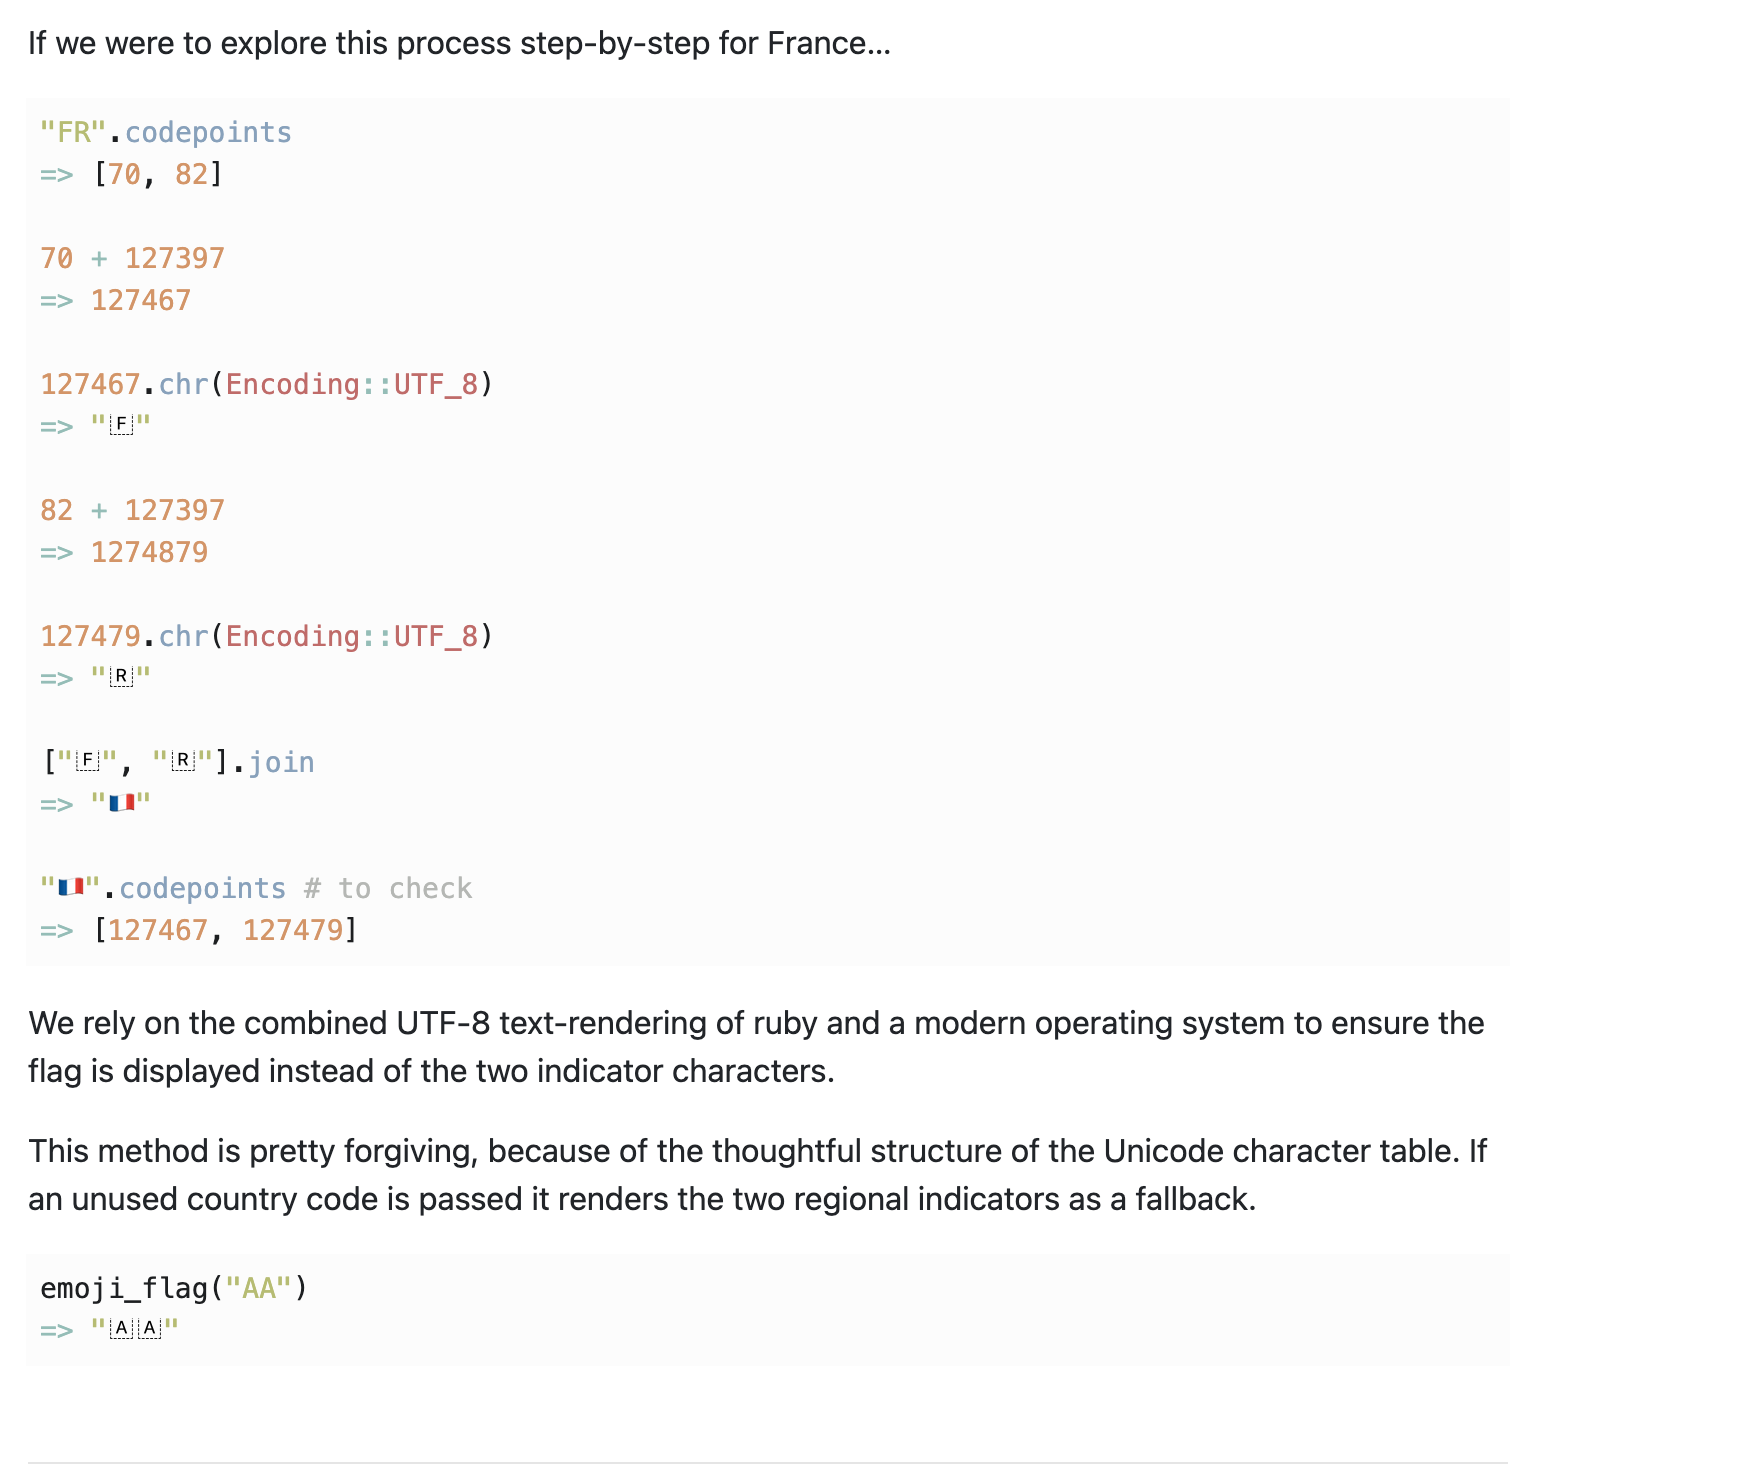
혹시 나처럼 정말 궁금한 사람들을 위해 찾아옴 .....ㅎ 정말 단 4줄에 문서를 몇개를 들락날락 했는지 모르겠다... 조금 어렵지만 이런식으로 구조가 되어있다고 하니 참고할사람들은 참고해도 좋을듯하다!
이번 개념들은 뭔가 내가 엄청 조리있게 설명못할 것 같아 그리고 참고하면 좋다~ 이런 느낌으로 가져왔으니 다들 편하게 같이 흐름 정리만 하자!
결국!!!! 정리하면!!!
 // 해당 국가코드를 이모지로 변환시키는 함수
const getFlagEmoji = (countryCode) => countryCode.toUpperCase().replace(/./g,
     char => String.fromCodePoint(127397 + char.charCodeAt())
  );
  // data-flag 속성을 모두 찾아서 문자열로 가져오기
  const flagReplace = document.querySelectorAll('[data-flag]');
  // 모두 가져와서 하나하나 getFlagEmoji 함수를 실행한 값을 html 에다가 하나씩 넣음
  flagReplace.forEach(s => s.innerHTML = getFlagEmoji(s.dataset.flag))
이게 되겠다!!!!! 휴!!!!!!!!!!

html에는 이렇게 적어주면!!! (user 는 view 에서 들고온 request.user !)
실행 화면

와!!!!!!!!!!!!!!!! 잘뜬다
근데 진짜 이 방법 찾는다고 몇 시간을 헤메서 된건 기쁘지만...
한계
브라우저마다 다르게 나타나는 이모지
window 에서 KR 처럼 이모지가 안나타나고 국가코드만 나타남 (아마 아스키코드 문제인거 같다.)
열심히 찾았지만 결국 조금의 한계점은 존재했다. 하지만 그래도 나름대로 열심히 찾고 내가 적용한 방법이라 그런지 나름 만족..... 그리고 아무리 구글링해도 국가 필드에서 css 까지 하신분은 못봐서..쓰읍 아쉽지만 그래도 나름 뿌듯하다... 지금은 카페마감 1분전 마지막까지 짜내서 적는중임 혹시 윈도우에서 이모지 방법을 아시는분은!! 공유 부탁드립니다!!! 그러면 오늘의 포스팅!!! 끝!!!!!
'django' 카테고리의 다른 글
| 2021.11.11 Django Multi Image (6) | 2021.11.11 |
|---|---|
| 2021.01.22 django User Custom ModelForm (0) | 2021.01.22 |
| 2021.01.18 django User Custom Model (1) | 2021.01.18 |
| 2021.01.15_django hitcount 조회수 (0) | 2021.01.15 |
| 2020.11.08_django_category 자동 넘겨주기 (0) | 2020.11.09 |


댓글